

A 2D diagram of the stars within 20 light years.
It would seem that I’ve been neglecting this blog lately, as I have not posted or made changes for over two months. This isn’t because I’ve being lazy or forgetful, it’s simply that I’ve been extremely busy doing other things. This is grant season, and I finished writing and submitting four grant applications just this last week and several others over the last two months. My students and I have completed our Tintic Mining District soil contamination study sponsored by a grant from the American Chemical Society (see our other blog: http://elementsunearthed.com for a description of what we did). I also traveled to San Antonio to present three times at the National Science Teachers Association conference on April 11-14 (more on this later). Then we took our high school students to Moab and Arches and Canyonlands National Parks for three days. I’ve also completed a draft of a video about Walden School of Liberal Arts for our open house. Before I get swallowed up again in the craziness at the end of the school year and moving into our new building, I would like to add a few posts to both of these sites.

The Completed 3D Star Model from below. Sirius is the large blue star; Aipha Centauri is the trinary system.
In my astronomy class, we had gotten as far as introducing the stars and their properties at the end of second term, including the stellar parallax activity I shared last post. We continued our unit on the stars third term by preparing and building a physical model of nearby space out to 13 light years. We do this at a scale of one light year equals 5 cm, which means the whole model takes up about 8 cubic meters (it is 2 meters on a side). We first hung a foamcore platform that I had made previously with the distances out from our sun (Sol) measured as concentric rings on the underside of the platform and the celestial longitude (right ascension) marked out in degrees around the circles. By using this hanging platform, we don’t have to tape the stars to the ceiling and have a better reference system for finding the coordinates.
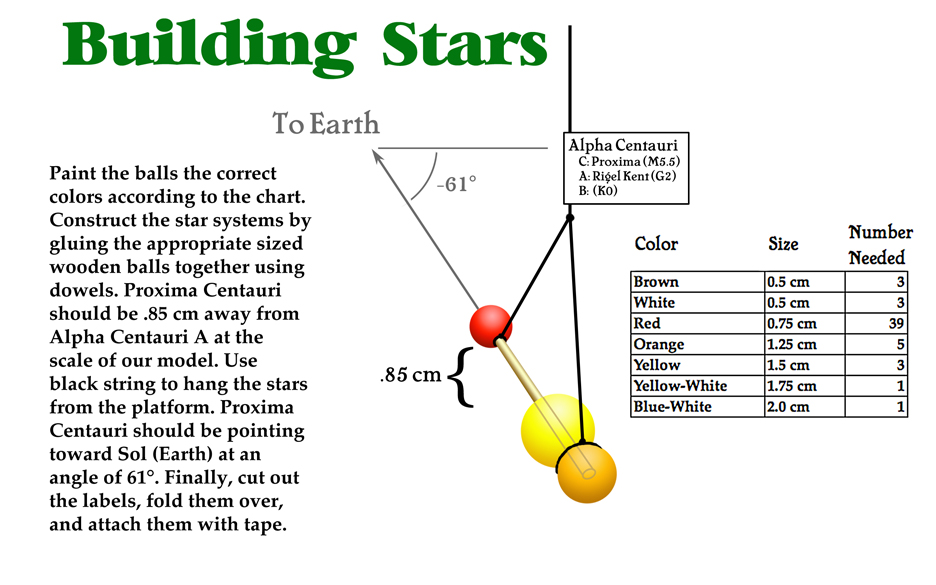
How to build the stars for the model.
The stars are made from wooden balls of various sizes, ranging from < 0.5 cm for planets up to 2.5 cm for larger stars like Sirius. Most of the stars near us are red dwarfs, and they are 1.0 cm in our model. Each star is hung from a thick black thread, and multiple star systems like Alpha Centauri are glued together or attached to wooden dowels. I also wrote up labels for each star system. We painted the balls colors according to their stellar types, with A stars blue-white, F stars yellow-white, white dwarfs white, G stars yellow, K stars orange, M stars red, and L, T, and Y stars brown. We made the planets green. I had made all the stars previously, except this year we added the brown dwarfs and planets according to what is known now (as it turned out, a new binary brown dwarf system was added to the online list after we completed the model, so new star systems are still being discovered near us).
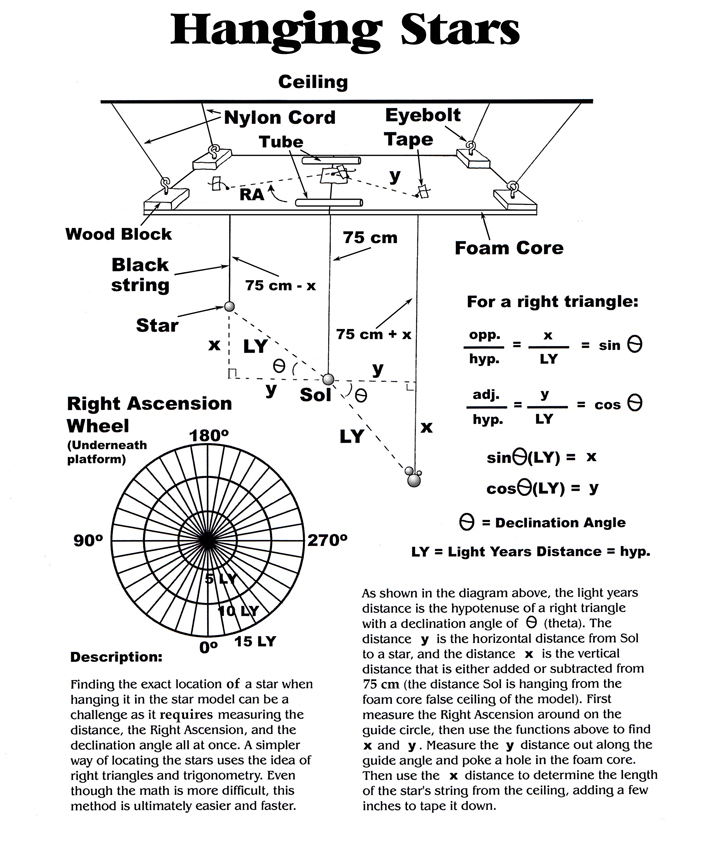
Instructions for hanging the stars and designing the platform.
I used to have students hang stars using a primitive sextant made from a meter stick, protractor, and string with a plumb bob. They had to first hang Sol, then measure the right ascension of a star around from the vernal equinox, then the declination up and down also from Sol, and the radial distance from Sol. This was hard to do accurately. Now, with the platform, we use trigonometry to calculate the horizontal distance and the vertical distance. The radial distance in light years forms the hypotenuse of a right triangle, with the declination angle the angle used. From those two things, we can find the horizontal distance in our model with the cosine function and the vertical distance down from the platform using the sine function.
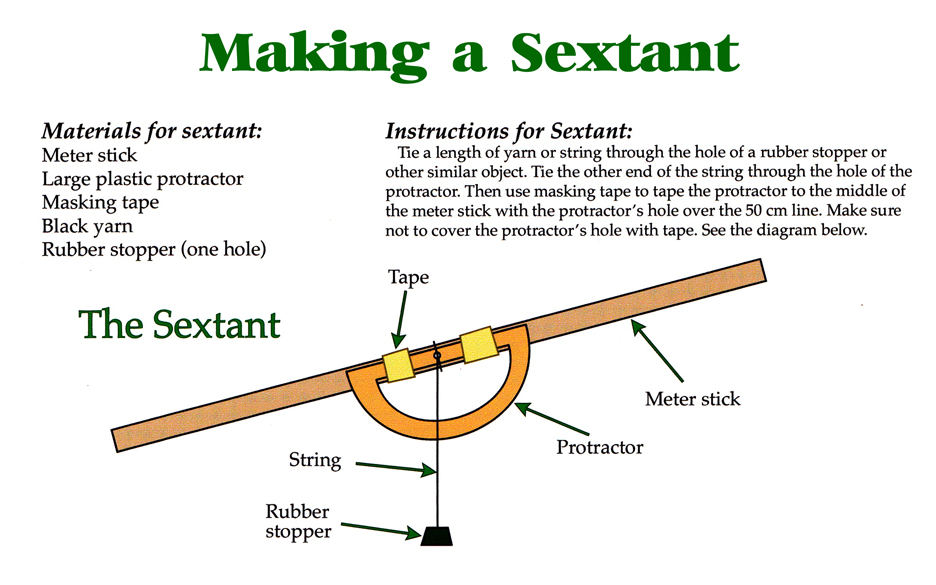
Diagram of the sextant used to verify the stars’ position.
To hang a star in our model, students first find the correct right ascension using the angles written on the underside of the platform. They then measure the horizontal distance out from the center (Sol) along that line, then poke a hole up through the foamcore of the platform and thread the star’s string through. They then measure the vertical distance down from the platform using two meter sticks (if the declination is negative) and pull on the string until the star gets to the correct final position. The sextant is then used to verify that the position is correct. We hand these in teams of 3-4 students, alternating through teams, which each do 3-4 stars at a time.
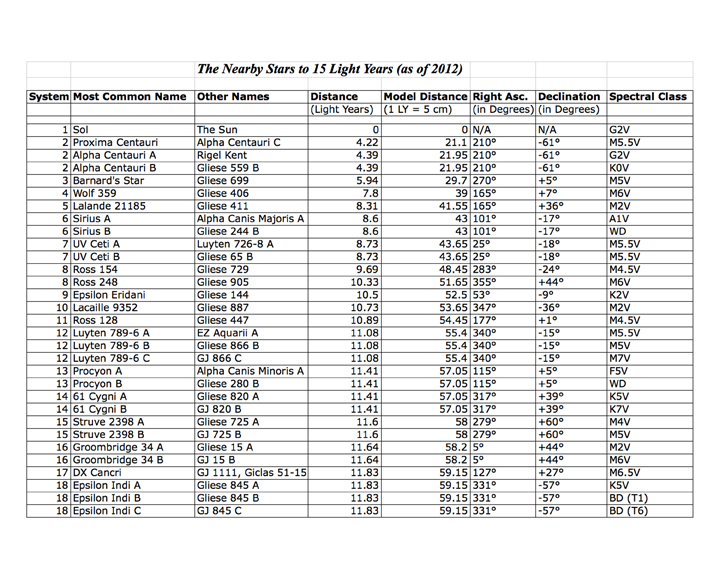
A table of the nearby stars, part 1
It takes about a day to hang the platform and prepare the stars, then another four days in class to hang the stars. Once the stars are hung, we also hang black cloth around three sides of the platform to simulate the darkness of space. While teams are waiting their turn, I have developed some assignments that ask them to analyze the number and types of stars, whether they are multiple or single, and extrapolate the possible number of brown dwarfs and planets within 13 light years based on those numbers. I ask them to calculate how big our model would be if it included the whole Milky Way galaxy (about 5 km in diameter) and how long it would take to hang the 200 billion stars (hundreds of thousands of lifetimes). I also have them write up a proposal for an interstellar voyage, picking a route through our model, designing the ship with its propulsion system, energy source, communication system, collision avoidance system, crew quarters, etc. They have to select the crew and discuss how to keep them alive for the long duration voyage. They also have to draw a schematic of the ship and label the parts.
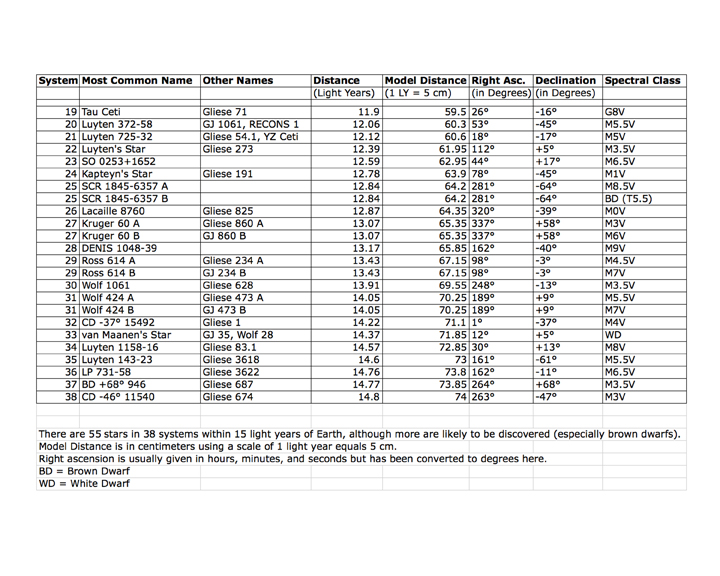
Table of the Nearby Stars to 5 light years, Part 2.
Given that this activity takes at least a week in class, how can I justify doing this? For an earth systems or earth science class, I wouldn’t, because the astronomy part of the course simply doesn’t allow for this kind of detail. But in a yearlong astronomy course, it is a useful way of culminating the unit on stars, as it puts all that we have learned together in a form that we can discuss and grasp. The Next Generation Science Standards have crosscutting concepts of scale and proportion, systems and models, energy and matter, and stability and change that can all be taught or reinforced through this activity. I have them calculate how big the stars really should be at a scale of one light year equals 5 cm, and the students are astounded to find that they would be about the size of a small molecule (say benzene) and that the planets would be about the size of an atomic nucleus. When the model is done, they sit inside and move their heads around, seeing how the stars and constellations shift position. The model also helps them to grasp the actual three-dimensional relationship of the stars’ positions; we always list them as they relate to Sol, but not to each other. We can see that nearby space isn’t symmetrical; there are stars grouped close to each other and there are voids without many stars. This unit also helps to prepare them for the next unit on exoplanets and how they are discovered, leading into the units on the solar system.
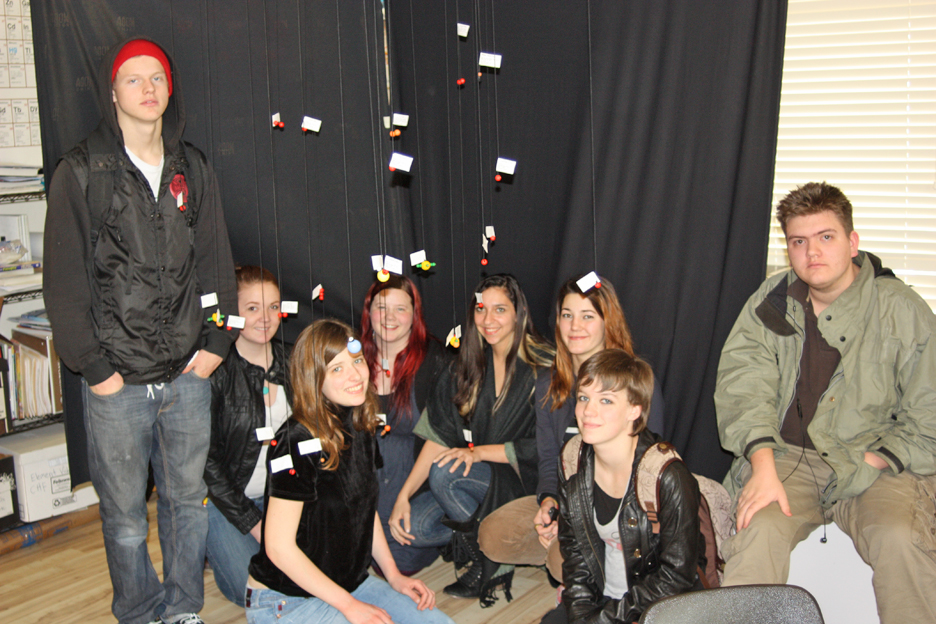
Students in my astronomy class with out completed star model.
One thing is sure: the students really understand stellar types, abundance, distribution, and coordinates by the time we are done. They have a chance to experience this kinesthetically and visually, which they don’t always get a chance to do. I submitted this lesson to NSTA’s high school teacher magazine, The Science Teacher, back on April 1. It is being reviewed for publication as of this writing. Eventually I hope to publish this entire unit on the stars as a curricular book with readings through the NSTA Press or as a trade book.
If you’d like to try this out, I have attached the lesson plan here: The Science Teacher manuscript
This is the rough draft manuscript automatically generated using the submission system set up by NSTA for The Science Teacher, and is likely to be modified if the article goes to publication. Please feel free to review it and send me comments, so I can incorporate them into the final draft. You can modify this activity however you want; I’ve built a smaller scale table-top model that I take to presentations and use in other classes where building the whole model would take too long or too much space. There is also an even smaller version out there that supports beads representing the stars on cut dowels, stiff wire, or lollipop sticks on a base instead of hanging them from a platform. I’ve even done a virtual version of this activity using 3D modeling software and I have the students create animations through the model to demonstrate their interstellar voyages.

Do you mind if I quote a couple of your articles as
long as I provide credit and sources back to your blog?
My website is in the exact same niche as yours and my users would
truly benefit from a lot of the information you present here.
Please let me know if this okay with you. Thanks!